homemade power inverter is increasing more popular among electronics experts. if you are looking for solar and power inverter or a low-budget device that helps you get AC power from DC source. Regardless of whether for solar energy systems, off-grid power, or backup solutions, constructing a DIY power inverter is an invaluable skill. In this tutorial, you will learn how to build an inverter with step-by-step guide, circuit diagram and video tutorial you be able to build your own DIY Power Inverter
By the end of this article, you’ll have a fully working solar and the power inverter you can work with solar panel kits with battery and inverter, emergency backup, or other AC driven applications in the U.S. and Australia. If you want to get the most out of your solar setup, consider why solar and power inverter systems are the best power source for modern homes. Understanding solar battery bank batteries, including types, lifespan, and costs is crucial for efficient energy storage. To match your inverter properly, check out our 500-watt solar panel power output and cost guide. Planning is key — use the solar panel dimensions and space calculator to ensure your system fits perfectly. And if you’re curious about full independence, learn if you can live 100% off-grid with solar, including the truth and costs.
Let’s get started!
Disclaimer:
This DIY inverter project is for educational purposes only. Ensure proper safety precautions when working with electrical components. High voltage can be dangerous—proceed at your own risk. The author is not responsible for any damage, injury, or legal issues resulting from this guide.
What is a Power Inverter
A power inverter is an electrical device that converts the DC (Direct Current) from a battery or solar panel to AC (Alternating Current) which is used by many household appliances. Inverters are heavily utilized in solar panel inverter systems, UPS backups, and renewable energy projects in both Australia and the U.S., especially in off-grid areas.
Types of Inverters
- Then there are modified sine wave inverters – cheap but not ideal for sensitive electronics.
- Pure Sine Wave Inverter – the most expensive but works with everything.
- Solar Micro Inverter– Designed for solar energy systems for panel-level DC to AC conversion.
In this guide, we will focus on how to create an inverter using a simple circuit that produces AC power from a DC source.
How Does DIY Power Inverter Function
An inverter fundamentally switches the polarity of the DC voltage (using transistors or MOSFETs) as quickly as possible to convert DC power from a battery into AC power. This creates an oscillating current, which a transformer converts to a usable AC voltage.
Step 1: The inverter receives DC power from a battery or solar panel.
Step 2: The circuit creates a square wave signal using an oscillator (e.g., a 555 timer IC).
Step 3: MOSFET transistors amplify the signal to a higher voltage.
Step 4: A transformer converts the low-voltage AC into a standard household voltage (e.g., 120V AC in the U.S., 230V AC in Australia).
Step 5: Filtering components (capacitors and inductors) refine the waveform for better efficiency.
Materials and Tools Needed
| Component | Quantity | Purpose |
|---|---|---|
| MOSFET (IRFZ44) | Depends on size | Switching component |
| Transformer (12V-120V for U.S., 12V-230V for Australia) | 1 | Voltage conversion |
| Resistors (1kΩ, 10kΩ) | Multiple | Current regulation |
| Capacitors (470uF, 1000uF) | Multiple | Filtering |
| Diodes (IN4007) | Depends on size | Rectification |
| Oscillator Circuit (555 Timer) | 1 | Frequency control |
| Heat Sink | Depends on size | Cooling the MOSFET |
| Wires & Connectors | – | Circuit connections |
| Multimeter | 1 | Voltage and continuity testing |
| Breadboard / PCB | 1 | Circuit assembly |
| Soldering Iron & Solder Wire | 1 | Permanent circuit connections |
| Insulated Enclosure | 1 | Protects the inverter from damage |
All these components can be sourced from local electronics stores or online marketplaces like Ali express (China), like Amazon (U.S.), eBay, Jaycar (Australia).
Understanding the Circuit Diagram
To ensure your DIY power inverter works efficiently, it’s important to understand the circuit design.
Circuit Overview
Egs002 spwm driver board.
This signal is amplified using MOSFET transistors.
The transformer steps up the voltage from 12V DC to 220V AC.
A capacitor and diode network smooths the output.
Circuit Diagram
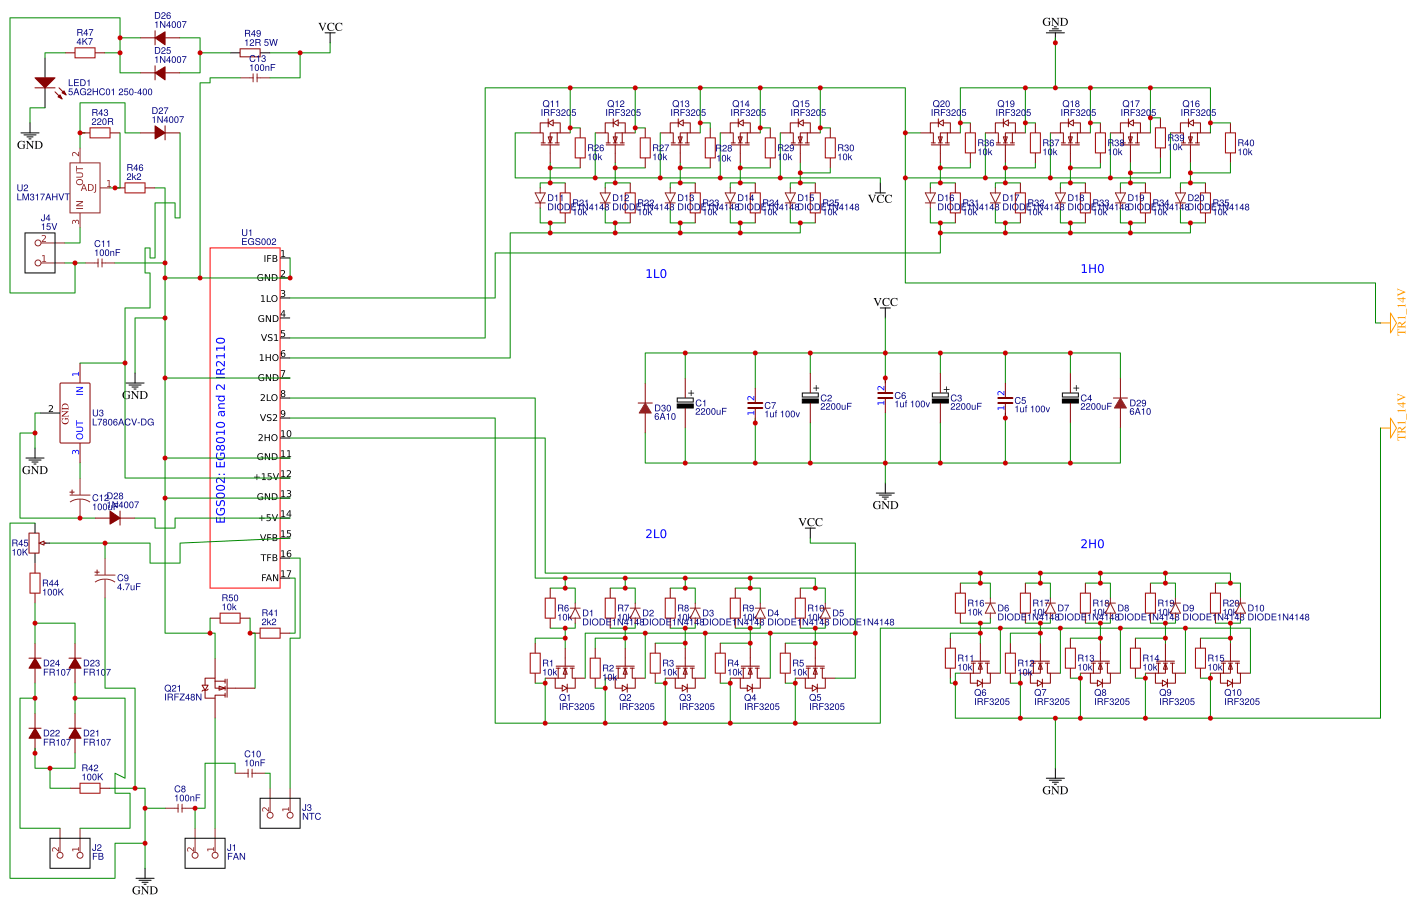
Tip: If you’re unsure about any connection, refer to the diagram image above
Making Your Own Inverter: A Step-by-Step Guide
Step One: What are you going to Prepare
- Collect all the materials listed above.
- Ensure all specified components are compatible.
- Gather tools such as a soldering iron, wire cutters, and a multimeter.
Step 2: Assembling the Circuit
- Place components on a breadboard for testing.
- Connect the Egs002 driver to generate pulses.
- Attach MOSFET transistors to amplify the signal.
- Connect the transformer to step up the voltage.
- Add heat sinks to MOSFETs for cooling.
- Ensure all connections are tight to prevent short circuits.
Step 3: Testing the Inverter
Use a multimeter to check voltage levels.
If the output is 220V AC, the circuit is working.
If the voltage is too low, check connections.
The fourth step: Enclosure Over the Inverter
Use a metal or plastic case for safety.
Add ventilation or a small fan for cooling.
Label input and output ports for easy use.
Watch the Full Video Tutorial Here
Click below to watch the full video of inverter made from scratch
Troubleshooting & Common Mistakes when building homemade power inverter
Low Output Voltage?
- Check transformer ratings.
- TBO: Make sure MOSFETs are good.
Overheating?
- Use a larger heat sink.
- Ensure proper ventilation.
Inverter Not Powering On?
- Verify all connections.
- Test components individually.
Short Circuit Issues?
- Cover any exposed wires with insulation tape.
- Make sure soldering points are double-checked.
Frequently Asked Questions About Diy Power Inverter
How long does the inverter build time take?
It is based upon your experience. The time duration for this project from a beginner to complete is 2-4 hours.
Is this inverter suitable for a solar panel system?
Yes! Just to make it clear, this inverter can be used in conjunction with a solar panel inverter with a battery bank.
What appliances can be powered by this inverter?
This inverter is suitable for low-wattage devices, including LED lights, small fans, and phone chargers. If you’re powering larger appliances, you’ll need an inverter with a higher wattage rating.
Is it possible to use a solar micro inverter to accomplish this?
A solar micro inverter is not horizontal. In this project we will talk about a simple power inverter.
Conclusion & Next Steps
Congratulations! You have now learned how to build an inverter from the ground up. Ideal for hobbyists, solar power enthusiasts, and DIYers creating solar and power inverter or an off-grid solar power system in the U.S, Australia or any other countries
Next Steps
✅ Test the inverter with different loads.
✅ Experiment with pure sine wave circuits for better efficiency.
✅ Consider upgrading to a solar panel kit with battery and inverter for a full solar power system.
Got questions? Drop a comment below! Spread this guide to friends and subscribe to the video tutorial for more DIY.
Related Posts:
- Why Solar Energy for Companies Is Booming—and How Your Business Can Benefit
- How Much Does Solar Panel Installation Cost in 2025? A Complete Guide
- Top 5 Deep Cycle Marine Battery for Off-Grid Solar Systems (2025 Reviews)
- Best Time to Use Heavy Loads on Solar Power: A Guide for Homeowners
- Texas Solar Tax Credits 2025 – What You Need to Know
- How You Can Install a Solar Power System at Home
- Most Suitable Batteries for Solar Panel Inverters
- How to Make a DIY Inverter at Home: Step-by-Step Guide for Beginners
Author
John is a Solar Energy Writer & Researcher with over 11 years of experience in renewable energy. As the founder of TSP, he is passionate about helping homeowners...